Pages

Thursday, December 29, 2011

New Photoshop Software

I finally got my Photoshop CS5 software installed.  I played around with one of my photos this evening. Wow, I must say that learning photoshop in depth is a very tedious task!  Hopefully I start picking some of the tips up that I've been reading about.  (much easier watching than actually re-doing.)

Here is the photo BEFORE:


Friday, December 16, 2011

Lindsey's Top Ten: Holiday Gift Guides for Photographers

I'm channeling Letterman with this post in my Top Ten Holiday Gift Guides for Photographers:  (except I'm starting with #1 as my favorite websites)


No. 1 - The Ultimate Photographers Gift Guide - Lens Pro To Go
The Lens Pro ToGo holiday list is a great list with a whole range of prices and products.  I found this list to be very helpful with basic to technical camera gear, lighting gear, software, and educational tutorials.  I found this list very helpful.  There are many things that caught my attention and I also would like. 


No. 2 - The Official 2011 Holiday Gift Guide - photo.tutsplus.com
The Photo Tuts list is on of my favorite lists because of the different price ranges and beginner to professional categories.  They have grouped items like camera straps, camera bags, clothing & accessories, tripods, DSLR cameras and basic digital cameras, lenses, memory cards, vintage cameras, and even some fun stocking stuffer ideas.  Sign me up for the Nifty Fifty lens.  I really want the Canon 50mm f/1.4.  :)

Tuesday, December 6, 2011

Taking Photos of Christmas Ornaments

Last year I was trying for a bokeh effect with the Christmas ornaments on my parents' tree. I like how these turned out, considering I'm using a kit lens, and I didn't use any photoshop techniques on them. White lights are definitely a plus when photographing your christmas tree. It gives everything a nice ambiance.

My tree at home this year has blue LED lights and its not nearly as warm and bright as the white lights on my parents' tree. (I took some pics of my tree at home this year. I'll post them soon.)


Thursday, December 1, 2011

The Day a Hot Air Balloon Landed at My House...


When I was little I had a very big imagination and was always curious about things. I remember in 3rd grade, I was laying in bed with the thermometer in my mouth...pretending to be sick so I could stay home from school. I remember trying to make my mouth as hot as I could to make my temperature rise. I guess kind of like telekinesis, but I didn't know it was called that back then. I laugh at that now...thinking I could use telekinesis to make the temperature rise...

Do You Make These 7 Mistakes When You Blog?


Very interesting tips. Thought I would share them.

Do You Make These 7 Mistakes When You Blog?
Courtesy of http://virtualphotographystudio.com

This past week I’ve been teaching classes on blogging and becoming web savvy with your marketing. And the questions students asked reminded me of some of the top mistakes bloggers make with their blogs, especially if you’re new to blogging and haven’t really cracked the code of increasing traffic enough to bring in new clients.

After blogging for years, and writing well in excess of 1,000 posts, I have made most of the mistakes top bloggers make – numerous times. And whether you are new to blogging or have done it for years, you can learn from these mistakes, and change the way you approach your own blog.

Mistake #1 You don’t post enough
How often do you post? If you haven’t seen the results yet, chances are you’re not blogging enough. If you’re not posting at least once per week at the bare minimum, you’re probably losing momentum. Frequency is what keeps people interested, and keeps them coming back. The more you post, the more traffic you’ll see. Commit to your frequency, and make sure you do it every week.


Mistake #2 You don’t write to engage your reader

After you’ve written a post, step back and read it one more time. Will people have a reason to comment on it? Did you ask questions? Is there something a little controversial? If not, go back and add a sentence or two that gives people a reason to comment. I love to ask questions along the way, and ask people what their opinions are. Make sure they have a reason to connect with you.


Mistake #3 Your post offers too much content

When people read a post, they usually have a minute or two to spare. Not 30 minutes to read a novel. Try to make your posts a minimum of 200 words for traction within the search engines, yet less than 800 words to make it readable in just a few minutes. I also like to split up my posts into bullet items, tips, or suggestions to make it more readable. And memorable.

Mistake #4 You don’t use comments to start the conversation
Comments are a great way to start up conversations. I usually login once or twice a day to check out my newest comments. I have to approve comments before they live. I do this to make sure spam comments don’t end up on my blog, and also so I can answer questions, make comments, or further clarify things if people have more questions. It’s a great way to further educate your readers on your business.

Mistake #5 Your headline is weak
Want to know what the most important part of your post is? Its your headline. Your headline is what attracts people, makes them want to click and read what you have to say. What can you do to make it exciting? What can you do to make people want to click and read? Using the same title again and again won’t do it. Instead, find ways of adding more to each one.


Mistake #6 Your summary is weak

If people read your title and like what they see, they’ll give you a few more seconds of time. They will read the first few lines and see if that grabs their attention too. After you write your post, head back to the first few lines and find a way to make it more enticing. It will keep people on your site longer, and increase your chances of gaining more clients down the road.


Mistake #7 Your post isn’t branded

What do you normally write about? Photography of course. Yet occasionally do you head way off topic, and write on something that holds little interest in anything your clients want to read? While it is important to develop your own personality, its equally important to give people what they want. Even if you want to talk about something you love, find a way to tie it back into what your clients love too.

http://virtualphotographystudio.com/photographyblog/2011/10/do-you-make-these-7-mistakes-when-you-blog/

My First Newborn Photoshoot

I took this photo almost 2 years ago, but love it so much. You can see the milk on his lips still. Happy newborn. I had some lighting issues as I couldn't find a good spot in his house, but I've learn some lighting tips since then. Overall, considering I had no experience, I felt pretty good about how this one turned out. I was just thinking I should probably soften his skin up with Photoshop and compare it.

Wednesday, November 30, 2011

Christmas Tree Portraits


I played around with my camera to get a shot of my parents' Christmas tree last year. I took this great one of my dad reading to my daughter by the tree. I love it.

Christmas Portraits with Bokeh

I saw this on Shutter Sisters' Blog and thought it was a great idea. For the record, I'm not claiming any ownership of this. lol. Great inspiration though...think I'll have to try it myself!


This is the perfect time of year to experiment with those beautiful fuzzy orbs of light we call bokeh. A string of Christmas lights is the ideal tool for creating bokeh in the background. For this photo, I setup a backdrop with strings of lights draped over top of a cream colored blanket. Then I placed my cute little subject about 10 feet in front of the backdrop and set my aperture as low as I could (f2.5 in this case). What resulted was a soft, creamy glow of bokeh in the background.

Now that Thanksgiving is behind us and the holiday twinkle lights are going up, get out there and play around with bokeh! Show us your results, past and present so we can all get in the spirit of the season!

www.shuttersisters.com

Saturday, November 26, 2011

Fundamentals - Color Vision - How it Works


I know this is pretty heavy stuff, but its important to learn how we perceive images and color, etc. in order to fully understand anything you're creating as an art. In addition to learning a basic understanding of color and light, this in-depth information regarding the human eye and optic functions has also helped me (a beginner in photography) get a a better grasp on the concept of how the camera functions on the inside. What I have learned so far is that the human eye operates very similar to our cameras...it is an amazingly fine tuned machine.

In a basic summary from the last post, Photography and The Human Eye, the 
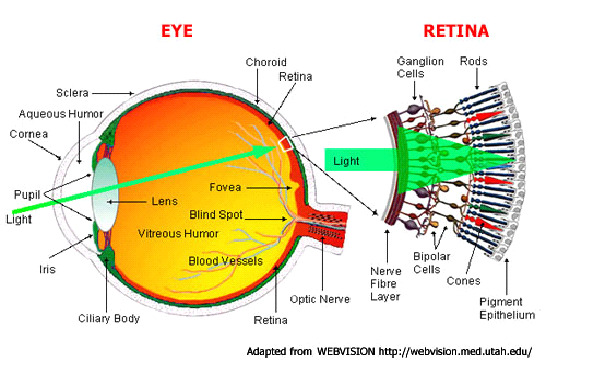
Cornea is the outermost surface of the eye, or "window" of the eye. The Iris is behind the Cornea and is like an adjustable diaphragm that controls light intensity to the Lens. The Lens is behind the Iris and adjusts to fine focus by changing shape and transmitting a focused image to the Retina in the back of the eye. The Retina the transmits the info from the Lens and through the Optic Nerve to the Brain to perceive the image.


The Retina is a highly specialized extension of the brain, which is located at the back of the eye. It contains a dense pattern of light sensitive receptor cells, called the rods and the cones. Cones can function in bright light and analyze color. While Rods provide a grey coarse vision in dim lighting.

The density of these photo receptors is also one of the things that determines the eye's ability to see in fine detail. In the central region of the retina, the rods and cones are packed even more tightly together. This part of the retina is called the Fovea and it is what gives us our sharpest vision. Away from the Fovea, the cells become more spread out, and thus making our peripheral vision the most blurred.


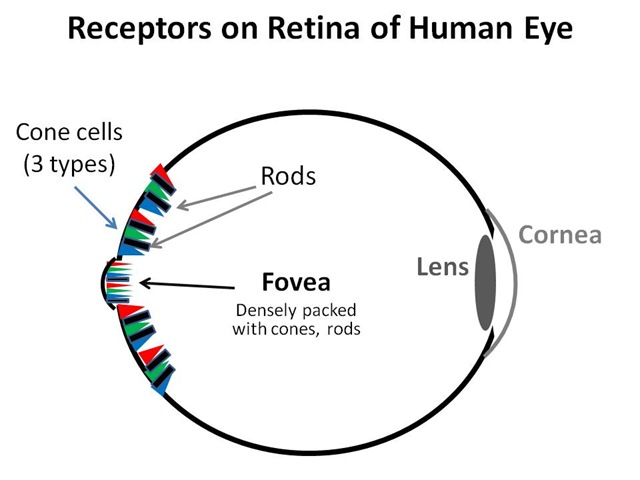
In the image below, notice the Cones (for daylight color vision) are one pattern and the Rods, which are more widely spaced, are another coarser pattern.
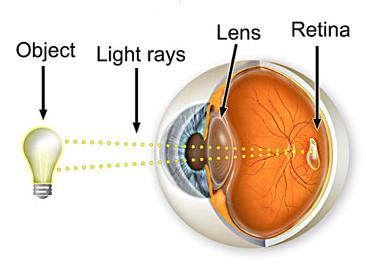
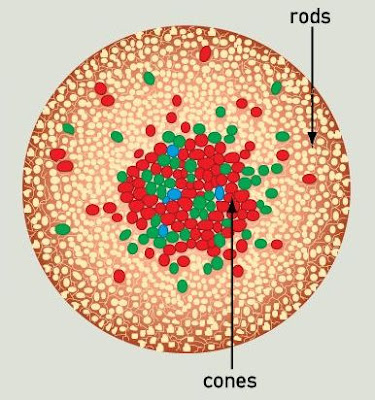

Image Formation
The light waves from a subject are collected and focused onto the retina by the eye's lens system. (more on light waves in the next post) Most of the refracting is done from the cornea. (more on Refraction will also be covered in the next post) The lens, which is attached at it's six edges to six muscles, focuses by changing it's shape. (See the example below)


The 
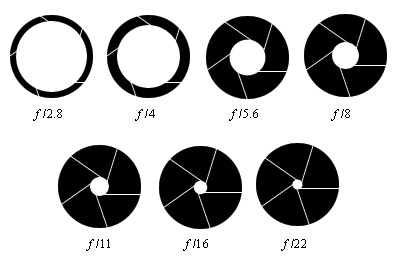
Iris, which closely resembles an aperture ring on a camera (see aperture pic below), controls the area of the lens that is used, concentrating light waves on the more efficient central part when there is sufficient brightness. (remember, it is the Fovea in the center of the Retina that gives us the finest detail.)


The image is projected onto the retina, where photopigments from the Rods and Cones are briefly bleached to record it. This bleaching is transferred into the optic nerve and to the brain as neural activity.
(without getting too off-topic, see the neural "brain" activity pic below, which I have cropped to eliminate any confusion)


Color Sensitivity
The ability of the eye to perceive color relies on three different types of Cone receptors in the Retina, each sensitive to a different color: blue, green, and red. This trichromatic system of color receptors varies considerably in importance and frequency of use. We are least sensitive to blue wavelengths, and most sensitive to green. When all three color responses of the retina's receptors are combined, the eye's overall sensitivity is at it's peak at green-yellow. This is the reason any shade of yellow appears light (see the bananas picture below), while most blues appear dark.


Interesting bit of information: As mentioned above, humans have trichromatic vision (meaning it consists of 3 primary colors), individuals with color deficiency (color blindness) typically have the same color vision as cats and dogs, called dichromatic vision (which consists of 2 primary colors), and the most extreme color deficiency is called monochromatic vision and consists of no primary colors, only black and white. However, there are many variations of color deficiency.


Color Deficiency aka Color Blindness More In Depth
Color Deficiency is classified as a Vision Impairment, one in which impairs the ability to distinguish certain, and rarely all, colors.

Normal Cones in the Retina react to red, green, or blue when lightwaves of certain frequencies (radiating color) activate the Cones that are sensitive to the frequency. The brain interprets the varying data of intensities and blends of the Cone responses. Color deficient vision essentially means a shortage or absence of "normal" Cones to detect color the three primary colors (red, green, blue).

The most common color deficiency, which accounts for about 98% of individuals with color deficiency, is red/green deficiency, in which the person cannot distinguish red and green. A small percentage of individuals cannot distinguish blue and yellow. Rarely, a person sees only in shades of gray.

This is a pretty cool color deficiency simulator: http://www.webexhibits.org/causesofcolor/2.html

(The link would not work for some reason, so you'll have to copy and paste)


Color Deficiency Test
The most common test for color vision and color deficiency is a series of circles that contain dots of color in random patterns with a structured pattern of differing color within the field. The structured pattern may be a number (most commonly) or an object. There is no treatment to compensate for color deficiency. People who are color-deficient learn to accommodate the deficiency through mechanisms such as memorizing the locations of colored objects (such as the sequence of lights in a traffic signal) and by making adaptations in their personal environments. A person may have friends or family members sort clothing by color, for example, and label the color groups. Some people who have mild color deficiency experience benefit from devices such as colored glasses and colored contact lenses that filter the lightwaves that enter the EYE. A yellow tint may improve blue-deficient color vision, for example. This type of correction is usually only helpful for only one color.


Causes of Color Deficiency
Most color deficiency is inherited, affecting about 8 percent of men and 1⁄2 percent of women. Color deficiency may also occur following an eye injury or as a result of aging. Some other causes for example are neurological disorders such as multiple sclerosis, heavy-metal poisoning such as lead or mercury, antimalarial drugs can cause permanent changes in the retina that affect color vision, and even some erectile dysfunction medication (Viagra) can temporarily intensify the perception of blue.

Fundamentals - The Human Eye


Photography is the manipulation of light to create and fix images. The study of light and the way it behaves is Optics. The physical properties of light, such as wavelength and refraction, determine the way it can be used, but ultimately, images are only recognized and interpreted by the complex mechanism of the eye and brain. Photography is the perception of the physical process.


Techniques: Optics and How They Work

Sight begins when light rays from an object enter the eye through the cornea, the clear front “window” of the eyeball. The cornea is actually responsible for about sixty percent of the eyeball’s light-ray-bending capability. The cornea’s refractive power bends the light rays in such a way that they pass freely through the pupil, the size-changing hole in the iris.

The Iris, the structure that gives the eye color, works like a shutter in a camera. It has the ability to enlarge and shrink, depending on how much light the environment is sending into the eye.

After passing through the iris, the light rays strike the eye’s Lens. This clear, flexible structure works much like the lens in a camera – shortening and lengthening its width in order to focus light rays properly.

In a normal eye, after exiting the back of the lens, the light rays pass through the Vitreous -- a clear, jelly-like substance that fills the globe of the eyeball. The vitreous humor helps the eye hold its spherical shape.

Finally, the light rays land and come to a sharp focusing point on the Retina. Continuing with our “camera” analogy, the retina’s function is much like the film in a camera. It is responsible for capturing all of the light rays, processing them into light impulses through millions of tiny nerve endings, then sending these light impulses through over a million nerve fibers to the Optic Nerve.

The optic nerve is sort of like an extension of the brain. It is a bundled cord of more than a million nerve fibers. The light impulses travel through this nerve fiber to the brain, where they are interpreted as images.

Cornea - Iris - Lens - Retina - Optic Nerve - Brain = Vision


Rods and Cones of the Retina Wall

Cones - light sensitive , pigmented chemicals in the cones react to different wavelengths of red, green or blue to record color.


Rods - insensitive to color, but very sensitive to the intensity of light and contain a pigment called rhodopsin.


Rods and cones are NOT evenly distributed across the retina. In the Fovea, there are only cones. While the entire retina contains a mixture of rods and cones, the exact center of the retina contains the fovea, which is entirely composed of high-resolution cones, providing approximately a three-degree high-resolution window.

Tuesday, November 1, 2011

Creative Holiday Card Portraits

I LOVE making our annual Christmas card and am always looking for creative ideas. Here are some really cute ones for inspiration...


I love a trio or sequence of photos on a christmas card or in a frame.


This is very cute and easy to do...it makes it much easier to photograph kids when they're sitting.


How can you not love this little guy...taking a cute candid shot like this one is very cute on a christmas card.


This beach theme is adorable, of course depending on if you live close enough to the beach, or if you just moved to the beach. Very cute.


This one would be better for a studio, but is probably doable if you want to DIY.


Here is another example of a sequence of photos that can also be used together on a holiday card.

It helps if you're somewhat proficient with Photoshop and can make edits to coloring and whatnot, but its not essential to creating a clever holiday card. An example of a Photoshop edit I did two years ago:


If you don't have kids, but have pets, they are also a cute inspiration for a holiday card. I have done this in the past as well. They are very cute.

Pets:

This picture makes me smile...how would you not enjoy receiving a holiday card with this photo?!


This photo is a great DIY example... use a red scarf and wrap it around the dog. Have a volunteer either hold the dog still for the photo or stand behind the photographer to grab your pet's attention.

Using A Zoom Lens The Right Way

phototips.biz: Using A Zoom Lens The Right Way: Zoom lenses are a great asset to photographers. Especially the the more expensive kind with the really good optics, wide open apertures, a...

Sunday, October 9, 2011

Photoblog - Pet Inspiration

Cute Running Puppies

Cute Running Puppies (clipped to polyvore.com)

I would love to learn to get a picture of my trio of maltese doing this! (hmmm...do I need to install a wood floor? haha)